In this post we will be creating a local Swarm cluster running in VMs on Boot2Docker.
We will be using Consul as a kvstore for:
- node discovery & overlay networking,
- swarm leader election, and
- as a config store for other cluster components (i.e Interlock config).
Swarm makes use of the libkv library to support not only consul but multiple store backends: (etcd,zookeeper,..).
All Docker Engines will be created through Docker-Machine with TLS enabled. Additionally, we will see how to configure Boot2Docker with a static IP and install the netshare Volume Driver to mount VM host folders across all cluster nodes for persistence - allowing any statefull containers to be re-scheduled on different nodes without loss of data.
In a future post, we will look at deploying and scaling the sample voting app on top of this cluster with Docker-Compose, using the latest Interlock images with TLS authentication for communication with Swarm.
In the sample set-up in this first part, we will be using a single-node Consul cluster and a single-node Swarm-manager cluster. For High Availability we would need to deploy several Consul nodes and Swarm-Manager replicas behind a load balancer, which may be explored in a future post.
Finally, automation of all the manual steps using Ansible containers would be the perfect conclusion of this series.
We will be using Windows 10, Hyper-V and PowerShell for this setup, but it should be possible to repeat a similar setup on OSX (replacing CIFS by NFS in the netshare, for example).
Windows 10 Environment Setup
The quickest way to get everything ready on Windows would be by installing git-for-windows and the Docker Toolbox (VirtualBox).
However, if you are required to use the Hyper-V role… - the Docker Toolbox can/should not be used.
The following steps will guide you how to use docker, docker-machine and docker-compose with Hyper-V on Windows 10 (64 bit):
Hyper-V & NAT Setup
Before NAT support was added to Hyper-V (Q3 2015) in Windows 10, it was recommended to use VMWare’s NAT & DHCP services with Hyper-V.
It is also possible to use Internet Connection Sharing (ICS) with your Virtual Network, but I strongly advise against it. ICS requires manual re-configuration when switching between Ethernet and WiFi adapters, which is not suitable.
At the time of writing, I still prefer to use the VMWare networking services with Hyper-V as it still provides the most features. You could even extract the
vmnetconfig.exeUI tool from the VMWare Workstation installation source to easily manage your virtual networks (after only installing VMWare Player components):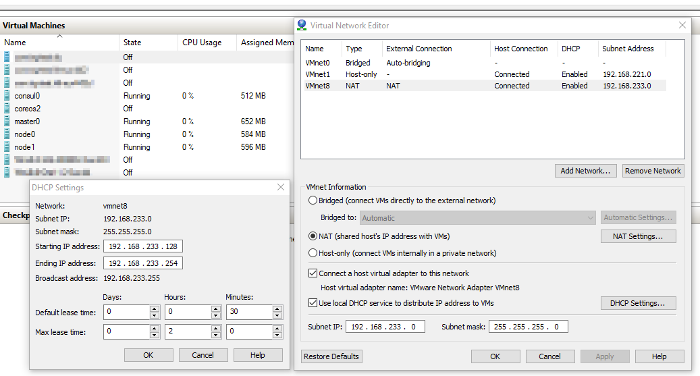
The VM networking services provided by the VMWare tools also include a DNS server which forwards any DNS requests from VMs to the host machine. This means that you only need to maintain the
etc/hostsfile centrally on the Hyper-V host for easy, IP-less, inter-VM communication.Before we move on, note down the name of your Virtual Switch configured with VMWare NAT, mine is
VMWare Nat.However, if you decide to use the new NAT switches introduced for Hyper-V on Windows 10, you will still need to find a solution for DHCP as well as DNS.
Git, ssh, scp, openssl, …
Installing git-for-windows is mandatory for a decent console experience on Windows. The git-for-windows bundle also removes the need for putty, plink & pageant when working with Linux machines.
Even though the Windows 10 console has greatly improved (transparency, multi-line selections, full-screen mode,
CTRL+C/Vsupport, …), I still recommend the usage of ConEmu as it has more features (quickly splitting console panels, switching between consoles, configurable short-cuts, …).Docker setup
In a bash console, execute the following commands:
Download the
dockerWindows 64 bit binary:curl -Lo /usr/bin/docker.exe https://get.docker.com/builds/Windows/x86_64/docker-1.10.3.exeDownload
docker-machineWindows 64 bit binary (includes hyperv driver)curl -Lo /usr/bin/docker-machine.exe https://github.com/docker/machine/releases/download/v0.6.0/docker-machine-Windows-x86_64.exeDownload
docker-composeWindows 64 bit binarycurl -Lo /usr/bin/docker-compose.exe https://github.com/docker/compose/releases/download/1.6.2/docker-compose-Windows-x86_64.exePowerShell set-up
To control Hyper-V, PowerShell needs to have Administrative privileges. in ConEmu pressing
WINDOWS+SHIFT+Wallows you to quickly create such a session: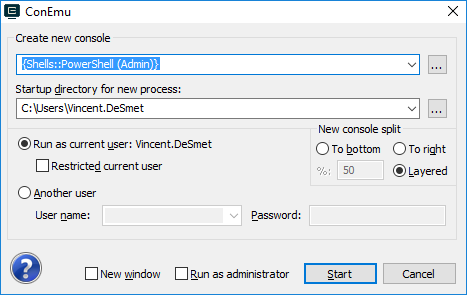
Make sure your
$PATHenvironment variable includes the/usr/bin/directory where we downloaded all the binaries earlier:$env:Path.Contains("$env:LOCALAPPDATA\Programs\Git\usr\bin")Should return
True.Confirm the Docker tools are working:
docker --version; docker-machine --version; docker-compose --versionShould return something similar to the following:
 Docker version 1.10.3, build 20f81dd
 docker-machine.exe version 0.6.0, build e27fb87
 docker-compose version 1.6.2, build e80fc83
During this guide, we will use aliases as follows:
New-Alias "dm" "docker-machine"Shared Folder Set-up
For this demo we assume a
demouser with passworddemois created on the Hyper-V host and a folder share read/writeable to this user exists under the namedemo.
Set up the Key Value Store
We will run Consul using a Docker machine. After provisioning the machine, we will configure a static IP, launch the Consul container and confirm Consul is working.
Provision the
consul0machineGeneric command:
docker-machine create consul0In PowerShell using Hyper-V and setting custom memory:
dm create `
 --driver hyperv `
 --hyperv-virtual-switch "VMWare NAT" `
 --hyperv-memory "512" consul0
Set a Static IP (ref) and reboot the machine.
In this sample setup, VMs use the
192.168.233.0/24subnet with the NAT gateway on192.168.233.2and a DHCP range of128-254. We will assign192.168.233.10as the static IP for our Consul node. Keep in mind you may need to update these values to match your configuration.By default, DHCP is enabled on the Boot2Docker interfaces, but we may disable it by killing the process managing a particular interface:
kill `more /var/run/udhcpc.eth0.pid`Do not run the following commands on the Boot2Docker VM just yet, we will add them to the boot process at a later stage.
To set a static IP and ensure a default route to the gateway, we would use the following 2 commands:
ifconfig eth0 192.168.233.10 netmask 255.255.255.0 broadcast 192.168.233.255 up
route add default gw 192.168.233.2
If we weren’t using PowerShell, We may add the above commands to the boot script as follows (quote the heredoc label to avoid backticks from being evaluated):
cat <<"EOF" | sudo tee /var/lib/boot2docker/bootsync.sh
kill `more /var/run/udhcpc.eth0.pid`
ifconfig eth0 192.168.233.10 netmask 255.255.255.0 broadcast 192.168.233.255 up
route add default gw 192.168.233.2
EOF
Or, using PowerShell with a single command from the Host:
echo "kill ``more /var/run/udhcpc.eth0.pid```n`
ifconfig eth0 192.168.233.10 netmask 255.255.255.0 broadcast 192.168.233.255 up`n`
route add default gw 192.168.233.2" | `
dm ssh consul0 "sudo tee /var/lib/boot2docker/bootsync.sh" > $null
Bounce the box
dm restart consul0Regenerate the certificates
Docker-Machine generated certificates are only valid for the old IP, changing the IP requires us to regenerate the certificates:
dm regenerate-certs consul0Start Consul
Docker-Machine helps you manage your environment configuration to target the right Boot2Docker VM:
docker-machine env consul0Activating this environment in PowerShell (using
iexas an alias forInvoke-Expression), looks as follows:dm env consul0 | iexConfirm all is working:
docker infoLaunch a single node Consul container, exposing its DNS and the Consul API:
docker run -d -p 192.168.233.10:8500:8500 -p 192.168.233.10:53:8600/udp --name consul -h consul --restart always gliderlabs/consul-server -bootstrapFollow the boot process of your Consul node:
docker logs -f consulPress
CTRL+Cand add an entry for the static consul IP to your hosts file (if your virtual network forwards DNS queries to your host, this will allow all your nodes to point to theconsul0node by its hostname)."consul0" | ` % { "$($(Get-VM $_).NetworkAdapters[0].IpAddresses[0]) $_" } | ` ac $env:Windir\System32\Drivers\etc\hostsConfirm Consul works:
iwr http://consul0:8500/v1/catalog/nodes | ConvertFrom-Json
Set up the Swarm Manager
We will now create a single Swarm Manager (no replication) and use the following Docker-Machine flags to configure our box:
Swarm flags:
| Flag | Description |
|---|---|
--swarm |
Provision swarm agent, see docs |
--swarm-master |
Provision swarm manager, see docs |
--swarm-discovery |
Discovery method, see docs |
We also specify Engine configuration options to enable Node Discovery in the created Docker engine, this is required to support overlay networking:
| Option | Description |
|---|---|
--cluster-store |
kvstore URL |
--cluster-advertise |
URL for cluster nodes to reach this node, see docs |
--cluster-store-opt |
additional cluster options |
Below is an overview of default sockets used by Docker components:
| Port | Protocol |
|---|---|
| 2375 | insecure docker API |
| 2376 | TLS secure docker API |
| 3375 | insecure swarm API |
| 3376 | TLS secure swarm API |
Combining the above information, this is how we may create our Swarm Manager with Docker-Machine using Powershell:
dm create `
 --driver hyperv `
 --hyperv-virtual-switch "VMWare NAT" `
 --swarm --swarm-master `
 --swarm-discovery "consul://consul0:8500/cluster1" `
 --engine-opt "cluster-store consul://consul0:8500" `
 --engine-opt "cluster-advertise eth0:2376" `
 --engine-opt "cluster-store-opt kv.path=cluster1/docker/overlay" master0
Once our box has been provisioned, we can confirm the engine options were applied by looking at the /var/lib/boot2docker/profile:
dm ssh master0 cat /var/lib/boot2docker/profile
You may have noticed that we specified custom paths for the config store, we can confirm the actual keys stored in consul with the following command:
iwr http://consul0:8500/v1/kv/?recurse | ConvertFrom-Json | ft Key
Join Nodes to the Swarm cluster
To create the Swarm Nodes, we follow the exact same steps as before, however we do not specify the --swarm-master flag.
Additionally, we may attach labels to our nodes depending on the roles we assign to them within our infrastructure:
dm create `
 --driver hyperv `
 --hyperv-virtual-switch "VMWare NAT"`
 --swarm `
 --swarm-discovery="consul://consul0:8500/cluster1" `
 --engine-opt="cluster-store=consul://consul0:8500" `
 --engine-opt="cluster-advertise=eth0:2376" `
 --engine-opt="cluster-store-opt=kv.path=cluster1/docker/overlay" `
 --engine-label="com.docker-saigon.group=frontend" `
 --engine-label "com.docker-saigon.environment=dev" node0
Don’t forget to change the --engine-label flags when provisioning multiple nodes with different roles
Confirm the nodes have joined the Swarm
Look at the consul data:
iwr http://consul0:8500/v1/kv/?recurse | ConvertFrom-Json | ft Key
Activate the connection to the Swarm cluster:
dm env --swarm master0 | iex
Note: The usage of the --swarm flag!
Once the nodes become available, install the netshare Volume Driver with the following steps:
ssh into the node (repeat for every node):
dm ssh node0Download the netshare archive:
curl -Lo docker-volume-netshare_0.11.tar.gz https://dl.bintray.com//content/pacesys/docker/docker-volume-netshare_0.11_linux_amd64.tar.gz?directExtract the archive to the persistant disk of Boot2Docker:
sudo tar -xf docker-volume-netshare_0.11.tar.gz -C /var/lib/boot2docker/ --strip=1 docker-volume-netshare_0.11_linux_amd64/docker-volume-netshare \
&& rm -f docker-volume-netshare_0.11.tar.gz
Create a .netrc file with credentials for the
demoshare we created in the Windows Environment setupsudo sh -c 'cat > /var/lib/boot2docker/.netrc <<EOF machine 192.168.233.1 username demo password demo domain 192.168.233.1 EOF'Enable the netshare volume driver to start at boot:
echo '/var/lib/boot2docker/docker-volume-netshare cifs --netrc /var/lib/boot2docker >/var/lib/boot2docker/log/netshare 2>&1 </dev/null &' | sudo tee -a /var/lib/boot2docker/bootsync.sh > /dev/nullBounce the nodes
Confirm the netshare Volume Driver is running
dm ssh node0 ps xawu | grep netshare
Demo on created swarm cluster
To conclude this post, we will quickly demonstrate working cross node communication and container discovery as well as the ability to mount shared storage from the host.
First, ensure we are talking with the Swarm manager:
dm env --swarm master0 | iex
List existing networks:
docker network ls
Note: A default bridge, host and null network exist for every node in the cluster.
Create a new network through swarm:
docker network create --subnet=10.0.10.0/24 nw
Note: It is good practice to provide the subnet when creating networks
Review the created network:
docker network ls
Note: The network was created as an overlay network across the cluster, this is the default when creating networks with swarm.
Instruct all nodes to pull the latest alpine image:
docker pull alpine
If using ConEmu, press CTRL+SHIFT+O to horizontally split the console
Ensure the newly created console is pointing to the swarm master
New-Alias dm docker-machine
dm env --swarm master0 | iex
Monitor the netshare logs on node0 in the top frame:
dm ssh node0 tail -f /var/lib/boot2docker/log/netshare
Define a volume for all nodes in the cluster:
docker volume create -d cifs --name /192.168.233.1/demo
Run a first container in the cluster:
docker run -dit --name container1 --net nw -v 192.168.233.1/demo:/demo alpine sh
Note: You should notice the volume being mounted on node0
Run a second container in the cluster:
docker run -dit --name container2 --net nw -v 192.168.233.1/demo:/demo alpine sh
Confirm Swarm is using the spread scheduling strategy by default and ran each container on a separate node:
docker ps
Confirm container1 can ping container2 (even though they are running on different nodes and using hostnames instead of IPs):
docker exec -it container1 ping container2
Confirm container1 can create files in the mounted volume:
docker exec -it container1 touch /demo/fromcontainer1
Confirm any files created by container1 are accessible to container2:
docker exec -it container2 ls -l /demo/
Tips & Tricks
Get a list of every running VM:
Get-VM | ? { $_.State -eq "Running" }
Get a list of every Running VM with IpAddress:
Get-VM | ? { $_.State -eq "Running" } | select Name, Uptime, @{l="IpAddress";e={$_.NetworkAdapters[0].IpAddresses[0]}}
Open console to a specific VM
$vm = Get-VM consul0
vmconnect $env:COMPUTERNAME $vm.Name -G $vm.Id
To print every cluster node with its ip (this could be piped to the Add-Content cmdlet for the /etc/hosts):
"master0","node0","node1" | % { "$($(Get-VM $_).NetworkAdapters[0].IpAddresses[0]) $_ " }